
In simple terms, the navigation menu is the horizontal bar with important links usually placed at the top of all the pages on the website. Navigation menus help visitors to navigate your website easily. You can create beautiful navigation menus on WordPress. The recent versions of WordPress have made it really easy to create custom menus. You can add menus as well as sub-menus. You can easily add links to your posts, pages, categories, or custom links in the navigation menu. There is also an option to place the menu on different locations of the website. In this article, we’ll see 2 methods to create beautiful navigation menus on WordPress.
Method 1: How to Add Navigation Menu in WordPress?
Step 1: You need to have a menu before creating a navigation menu. So, let’s create the menu first. Go to your WordPress dashboard. Go to Appearance.

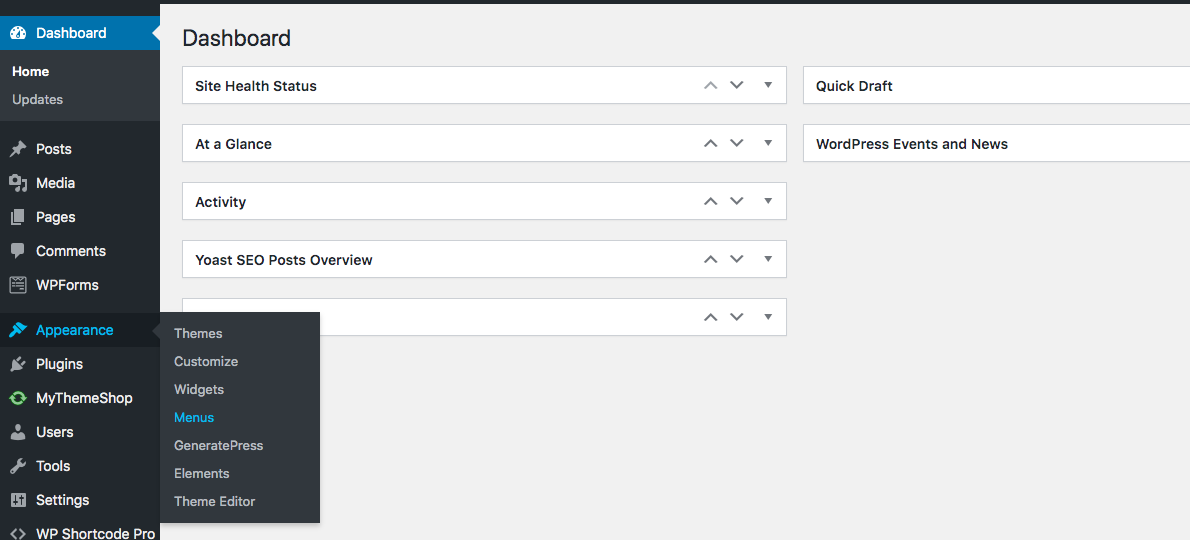
Step 2: Click on Menus. On the Menus screen, you’ll see a link called Create Menu. Click on it.
Step 3: Give your menu a name. Let’s call it “Main-Menu“
Step 4: Now that you have created a menu, you need to place it in a preferred position on the website. Under Menu Settings, you’ll see 3 options for Display Location – Primary Menu, Footer Menu, Topbar Menu.
- You can choose any option based on your preference. For example, if you want the menu to appear on the header, go for the Primary menu.
- Every theme has got a different design. Some themes are designed without primary menus. Then you can try for options like Header or Top.
- Click the Save Menu button after choosing the menu you want. After choosing each option, you can check it out on the website.
Step 5: Now, you have already created the menu and placed it in the location you wanted. It’s time to add items that are going to appear on the navigation menu on your WordPress blog.
On the left panel of the Menus screen, you’ll see sections like Pages, Posts, Custom Links, Categories etc.
- If you choose Pages, it will add links of all the pages on the navigation.
- If you choose Posts, it will show all the published post links on the menu
- The same with Categories.
- If you choose Custom Links, it will allow you to add custom links like you can add any internal or external links.
You can also choose the pages you want to appear on the Menu. You can choose pages like About Us and Contact Us to appear on the menu
Step 6: Let’s see how to customize the menu items.
WordPress uses the actual names of posts or pages or categories when it displays a menu item on the navigation menu. However, you can choose a different name. Click on the little Down arrow icon beside any navigation menu item to change the name.
Step 7: In the same way, you can change the position of navigation menu items by rearranging them.
Drag and drop the navigation item to rearrange it.
Place the navigation item under some other menu item to create a sub-menu. Don’t forget to hit the Save Menu button.
These sub-menus appear as drop-down menus on your WordPress websites/blogs. Just make sure that you place the menu item underneath another menu item to create the drop-down menus.
Method 2: How to Add Navigation Menu in WordPress Using a Plugin?
Plugins make it easy to add navigation menus. In case if you are creating a custom home page layout or a landing page, it’s a good idea to use plugins like Beaver Builder plugin to add navigation menu easily.
Beaver Builder is a page builder plugin that will allow you to customize the home page layout using a drag and drop mechanism. You can use this plugin to add a custom navigation menu to your WordPress blog or website.
On your WordPress dashboard, go to Plugins. Search for Beaver Builder. Install and Activate the plugin.
After activating the plugin, try to edit an existing page or post on which you want the menu to appear. You’ll see a button called “Launch Beaver Builder” on the WordPress post editor screen.
Click on it.
It shows up a dozen of ready-made templates to create navigation menus. Click on Choose a template.
Click on the Modules tab. Drag and drop the Menus module to the location where you want the navigation menu to appear on the website.
The Menu module opens up in a popup. Now, you need to select the navigation menu. Check out method 1 in the above section to know how to create a navigation menu on WordPress.
After choosing the navigation menu, the plugin shows lots of customization options like background, color, and other style properties.
Customize it as per your requirements and click on the Save button.
There are many other WordPress plugins that serve you to create navigation menus easily. Most of them create responsive menus and you can customize them to suit the style of your theme. Suppamenu Lite, Responsive Menu, ShiftNav, Max Mega Menu, WP Responsive Menu are some of the best plugins to create custom menus.
Wrapping up
We hope that you are able to create your desired version of the navigation menu using the 2 methods we have mentioned in this post. You can also create a WordPress navigation menu by creating a child theme. However, we do not recommend it for beginners. Please let us know via comments if you are stuck anywhere. Do check out our other blog posts for WordPress tutorials.